MIL-PRF-1/1260K
Pin connections
1
Grid
2
Cathode
3
Heater
4
Heater
5
Cathode
6
No connection
(do not use No. 6 pin
socket terminal as tie
point)
7
Cathode
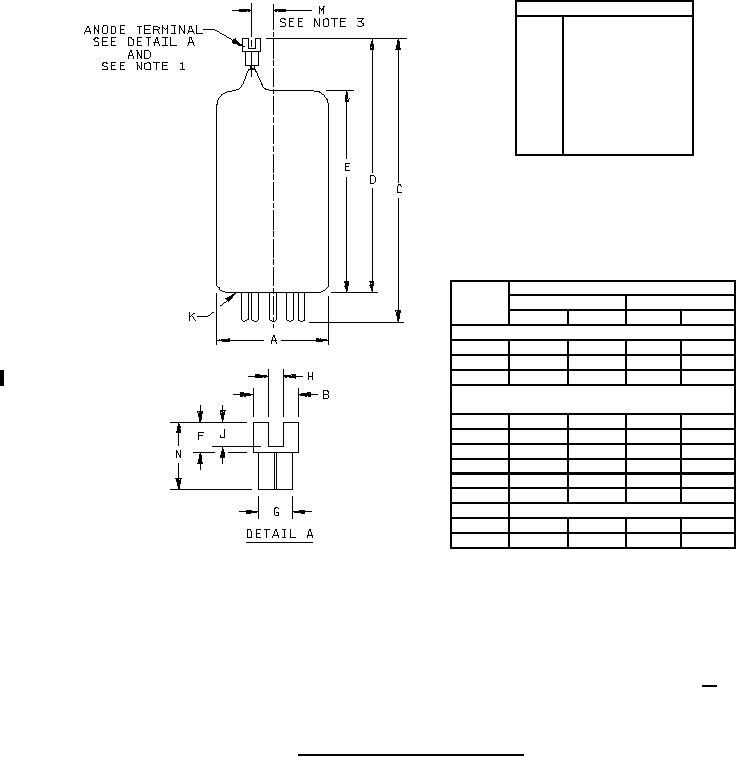
Dimensions
Ltr
Inches
Millimeters
Min
Max
Min
Max
Conformance inspection, part 2
A
.804
.844
20.42
21.44
C
---
2.478
---
62.94
D
---
2.228
---
56.59
Conformance inspection, part 3
(see note 4)
B
.115
.135
2.92
3.43
E
---
1.593
---
40.46
F
.090
.110
2.29
2.79
G
.087
.101
2.21
2.57
H
.037
.047
0.94
1.19
J
.070
.090
1.78
2.29
K
Base: E7-1
M
.075
.175
1.91
4.45
N
.210
.230
5.33
.5.84
NOTES:
1. Anode terminal material shall be nickel.
2. Pins must be gold plated, if made of tungsten.
3. This dimension lies in a plane passing through the centerline of the tube and pin 6.
4. Dimensions shall be checked during the initial production and once each succeeding 2-calendar months in which there in
production. A sampling plan shall be used, with the first sample of three tubes with an acceptance number of zero. In the
event of failure, the test will be made as a part of conformance inspection, part 2, with an acceptance level of 6.5 (see 21/).
The regular "12-calendar months" sampling plan shall be reinstated after three consecutive samples have been accepted.
FIGURE 2. Outline drawing of electron tube type 7191.
6
For Parts Inquires call Parts Hangar, Inc (727) 493-0744
© Copyright 2015 Integrated Publishing, Inc.
A Service Disabled Veteran Owned Small Business