MIL-PRF-1/1325F
Dimensions
Ltr
Inches
Millimeters
Notes
Min
Max
Min
Max
Conformance inspection, part 1
C
.602
.652
15.29
16.56
G
.590
.630
14.99
16.00
H
.320
---
8.13
---
Y
.740
.780
18.80
19.81
Conformance inspection, part 2
A
---
.230
---
5.84
B
---
.180
---
4.57
D
.213
.253
5.41
6.43
E
.049
.055
1.24
1.40
F
.166
.196
4.22
4.98
J
.245
.252
6.22
6.40 2, 4
K
---
.115
---
2.92
L
.400
.420
10.16
10.67
M
.048
.068
1.22
1.73
N
.547
.557
13.89
14.15
3
P
.035
---
0.89
---
Q
---
.010
---
0.25
R
.130
.160
3.30
4.06
S
---
1.460
---
37.08
U
.095
.135
2.41
3.43
V
.019
.022
0.48
0.56
W
.110
.120
2.79
3.05
Reference
AA
.015 Rad
0.38 Rad
AB
.030 Rad
0.76 Rad
AC
.060
1.52
NOTES:
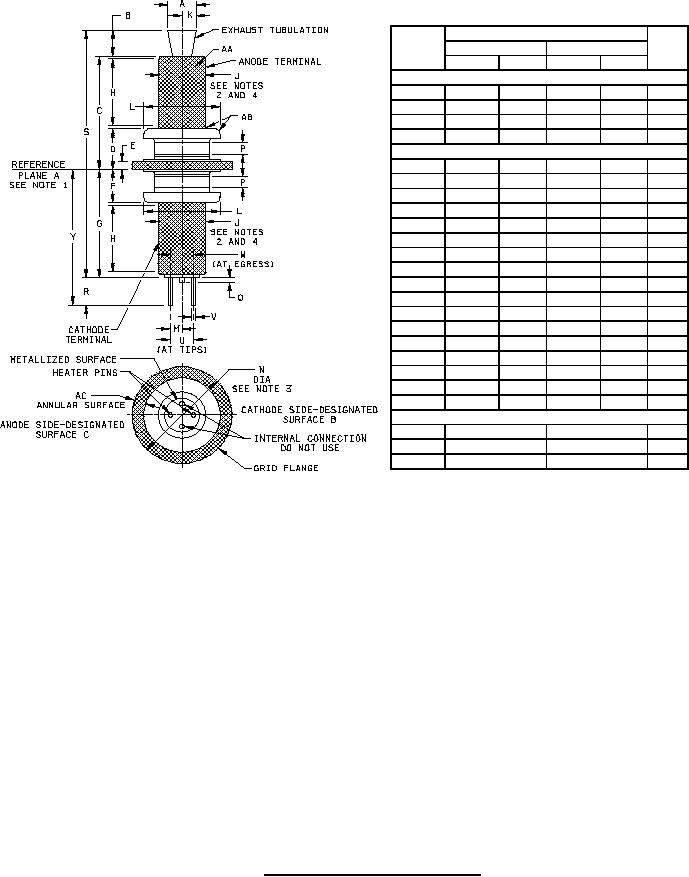
1. Reference plane "A" is defined as that plane against which annular surface "B" of the grid flange abuts.
2. The axis of the anode terminal shall be coincident with the axis of the cathode terminal within .010 inch (0.25 mm).
3. The axis of the cathode terminal shall pass through the exact center of the grid flange (dimension N) within .005 inch
(0.13 mm).
4. W ith annular surface "B" resting on reference plane "A", the axis of the cathode terminal (dimensions H and J) shall be
within 2 degrees of a line perpendicular to reference plane "A".
FIGURE 1. Outline drawing of electron tube type 7554.
6
For Parts Inquires call Parts Hangar, Inc (727) 493-0744
© Copyright 2015 Integrated Publishing, Inc.
A Service Disabled Veteran Owned Small Business